
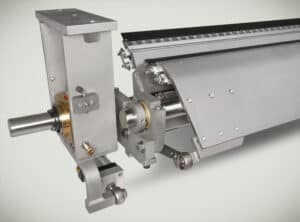
This article offers practical guidance on the installation of a rigid doctor system, using the Essco KF type rigid blade holder as the example. We will walk through basic installation practices, along with blade alignment, angle setting, and leveling procedures using digital, template, and manual bubble level techniques.
The Installation
Before lifting a doctor into position, be sure to place all collars, levers, and bearings onto the doctor journals in the order shown on the system print. This ensures all components are properly placed and nothing is missed.
Next, lift the doctor into position and set the bearings onto the brackets. It’s important to note that most doctors are designed with shims under the bearings, so be sure to check the system drawing to confirm.
Place the loading device bracket onto the bearing bracket, if so designed. Install bearing bolts and finger-tighten. Fully tighten the bolts only after final alignment is complete. Block the holder off of the roll surface (use clean broke paper, felt scraps, cardboard, etc.) until loading mechanism is connected.
Check for any interference. Be sure to consider oscillation, doctor unload, sheet and fabric runs, and roll movement.
Connect the pressure rig, air cylinder or torque arms to the levers or doctor back, as indicated on the system drawing. Orient lever(s) as shown on drawing (if not preset by key), then tighten setscrew to hold in place. Connect the loading device to the fulcrum point on one end of doctor only until alignment is complete. Perform doctor alignment only with natural doctor weight, or absolute minimum air-pressure required to contact the roll.
On some doctors, loading device fulcrum brackets must be located and mounted to frame(s) separately. As usual, refer to the doctor drawing to locate and ensure the cylinder or pressure rig is at 90 degrees to the lever.
Use a loading device to rotate the doctor/holder off of the roll in order to install the blade and set alignment as instructed in the following sections.
Alignment: Rigid Blade Holders
Install the proper new doctor blade in the holder as illustrated in FIG. 1. The Essco KF type end removal holders have a solid lip on the bottom channel. Blades are installed by sliding into the holder from the end.
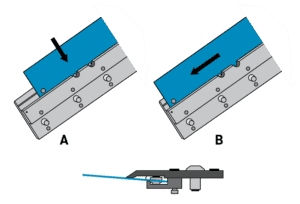
FIG. 1: The Essco front removal KF doctor blade holder. There are cutouts on the underside for KF type blades. In the end view, note that clips are on top of the doctor blade. Other holders have similar “FR” provisions.
KF type “front removal” holders have pairs of slots cut into the bottom channel lip on 36-inch centers to accommodate the retainer buttons on KF type blades. As shown in FIG 1, install the blade by lining up the buttons with the slots, press the blade into the holder, then slide sideways to its proper position. Insert cotter pins in holder ends to lock blade in position.
Set Blade Angle
When proceeding with alignment, be sure to make the following adjustments with rolls in operating position and proper nip pressure. For example, close and load press nips, calender, and supercalender stacks.
It’s also important to note, on soft rolls, rotate the rolls occasionally during doctor installation to avoid causing flat spots. After alignment is complete, remember to open the nips and raise the doctor off the roll.
Adjust the bearing position so the blade touches the roll on each end of the roll when lowered.
Blade Angle Check Method: Digital
Doctor systems are easy to maintain with exclusive service tools, like The Edge™, a precision, Essco-engineered digital guide for setting doctor blades to the proper contact angle and level.
FIG. 2 and FIG. 3 show the application steps in deploying this electronic Level:
- As shown in FIG. 2, place foot (4) on end of doctor blade with the fin centered on the blade tip.
- Press “ALT REF” to zero the unit and establish a roll tangent reference plane. Allow the reading to settle at zero (00.0).
- Place both tips of the foot on the doctor blade as shown in FIG.3.
- Read the doctor blade angle directly on the LCD screen.
- Move one end of the doctor toward or away from the roll until desired angle is achieved. Mark the position and tighten bolts. Repeat the process on opposite end.
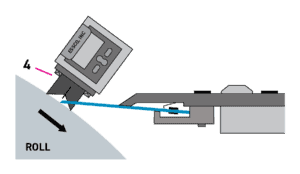
FIG 2: Proper position of The Edge™ device to zero the unit.
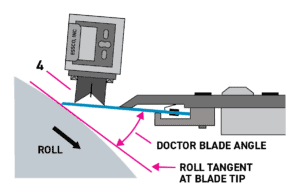
FIG. 3: Proper position of The Edge™ unit to read angle of doctor blade.
Blade Angle Check Method: Gauge Templates
Select the proper angle gauge template marked with the roll diameter and blade angle. Essco includes a template in the shipping packet with every new doctor.
As shown in FIG. 4, move one end of the doctor blade toward or away from the roll by sliding the doctor bearings until the blade contacts the roll and is flush with the template. When confirmed, mark the position and tighten bearing bolts to hold. Repeat the process at the other end.
For thick blades, make the template base flush with the blade bottom—slide the blade in on the roll so the template can be held on the roll at the blade end. Note: If you don’t have a blade angle gauge template, FIG. 5A shows how to make one.
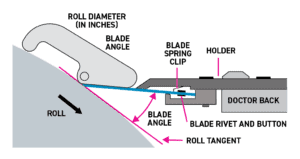
FIG. 4: Proper blade installation in KF-35A holder, and use of angle template to achieve correct blade angle.
Except for critical applications, such as press rolls and key sheet shedding positions, the angle should be set to within +/- 2 degrees. Critical doctors should be set to within +/- 0.5 degrees. Blade angles that are too steep will induce chatter and possible roll damage. Likewise, a blade angle that is too shallow will permit material to bypass the blade and lift it off the roll.
It’s important to note that a preliminary check of doctor level before setting the blade angle will allow you to adjust the angle on the high end of the doctor. On most doctors, the low end will be shimmed up. This will minimize changes to blade angle when setting level.
Making a Blade Angle Gauge Template
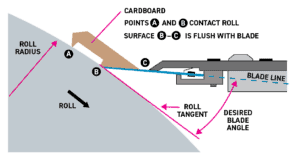
FIG. 5A: Trace an arc equal to your roll radius on a piece of paper. Draw a tangent to this arc and a line representing the blade at the desired angle to the tangent from the blade contact point, “B.” Now cut a piece of cardboard so it contacts the roll arc at points “A” and “B” and is flush with line “BC.”
Leveling the Doctor Blade
With one end of the doctor blade now set at the proper angle, the next step is to level the doctor to bring the blade parallel to the roll axis. The following leveling procedures show the use of digital, template, and manual bubble-level techniques.
Digital Leveling with The Edge™
The Edge™ is Essco’s exclusive digital guide for setting doctor blades to the proper contact angle and level. Place the foot on roll and slide up against the blade tip as shown in FIG. 5B.
Press “ALT REF” to obtain “zero” reading.
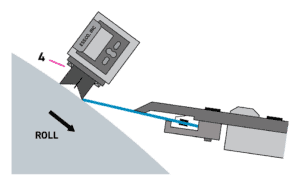
FIG. 5B: Proper position of The Edge™ to zero the unit for level check.
Next, carry the device to the other end of the doctor and place it against the blade and roll in the same plane as first end. If the reading is “zero,” the blade is level.
If the reading is not zero, move entire unit up or down roll surface until zero is attained. The vertical difference is the amount to shim at the low end to make doctor level. See FIG. 6.
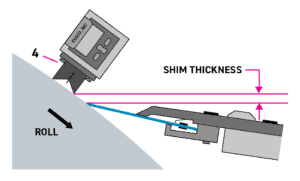
FIG. 6: Move The Edge™ unit up or down to obtain zero. The vertical difference is the amount of shim required to raise the low end of the doctor blade to level.
Manual Bubble Level
As shown in FIG. 7., place a bubble level on the roll, slide it up against the doctor blade tip and adjust so that the bubble is centered.
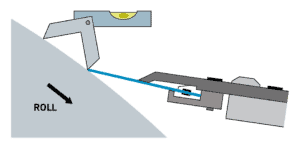
FIG. 7: When the doctor is level, bubble reads the same at both ends of the roll.
Without disturbing the level, move it to the other end of the roll. If the doctor is level, the bubble will be centered. If the bubble is not centered, slide the level up or down the roll surface until centered.
As shown in FIG. 8, the vertical difference is the amount to shim the low end to make the doctor level. Note: It is usually easier to shim the low end, unless bearings hang under the brackets.
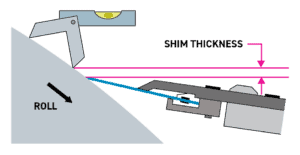
FIG. 8: Level reading illustrates amount of shim required to level the doctor blade to the roll axis.
Level setting is critical to doctor blade performance. It should be set within +/- 0.030 inches or less. Once the level has been set, move the bearings slightly as needed so the blade contacts the roll at each end. Double-check the blade angle, then tighten bearing bolts.
Be sure to tighten all fasteners before operating the doctor blade. Essco also recommends pinning the brackets to prevent movement.
As you can see, installation practices involve blade alignment, angle setting, and leveling procedures. Each can be accomplished using digital, template, and manual bubble level techniques. It’s also possible to make your own blade angle gauge template. So, whatever technique you deploy, it comes down to ensuring a job well done that will help maximize doctor performance. We can help.
Earl Perry, Sales/Service Engineer